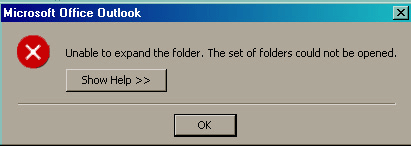
How to Fix “Cannot Expand the Folder” Error of OST File in Easy Way

Well, there are a number of users who come across various error message while opening MS Outlook OST file. It has been seen that whereas trying to add another mailbox to Exchange Server service in Microsoft Outlook, Outlook may produce an error “cannot expand the folder. The set of folders cannot be opened Outlook 2016 or any other edition.”

Here is the quick solution to resolve the error:
Repair #1. Select the Option “Folder Visible” for the mailbox that includes the folder you want to share
- The error “unable to expand folder” can arise if the option “Folder Visible” for the second mailbox is not sent by you. Therefore here are the complete steps that can be useful in order to choose or turn on the option of folder visible
- Choose the folder you want to share on your pc, right-click the mailbox, in the folders list and click Properties, on the shortcut menu
- Go through the Permission tab, make a selection of Folder visible option in the permission area
- Lastly, press on the “OK” tab”
- You can assign approval to the assigned folder
Repair #2. Unable to expand folder error of OST File by ScanPST – Fix
To resolve “Cannot expand the folder” error of OST file, you can install and run Inbox repair tool. The Inbox Repair Tool (scanpst.exe tool) is a free utility offered by Microsoft to scan and repair OST file. This utility will fix many errors of OST file and scans OST file for synchronization issues. To jump repairing Microsoft has added scanpst.exe utility in MS Outlook that can easily scan the .ost file for synchronization issues. This inbuilt recovery utility is situated in the Local Microsoft Office folder of your PC disk.
- You requisite to follow the below given procedure to run the scanpst.exe utility. First of all, close the Microsoft Outlook application.
- Go Through (C:) Drive >> browse the “Program Files” >> “Microsoft Office” >> “Office14” >> Go to “SCANPST”
- Press on the “SCANPST” and choose the OST file that has to be repaired or fixed and choose the repair button
- When it will display a successful message such as “Repair complete” message. Press on the “OK” button
If the above methods did not work perfectly, then the only method to fix OST file error is to convert OST file to PST file by using the reliable third party automated utility.
An easy and Trusted solution for Resolving OST file error
One of the most helpful ways of fixing OST file error: “cannot expand the folder” is by utilizing OST Conversion to PST Tool to convert OST file to PST file. This tool unaffectedly resolves all errors or issues related to Outlook OST file by moving it to PST file format, so that there won’t be any loss of emails and other attributes from your email account. You can use this tool to fix damaged/corrupted OST data files that are encoded and password protected. The program can convert OST to PST associated to Microsoft Exchange versions 5.0, 5.5, 2000, 2003, 2007 and 2010 on all major Windows operating systems like Vista, XP, 7, 8, 10, etc.
Procedure to change error showing OST file into PST
- Download OST File to PST File Converter on your Windows machine
- Install and run the software by following onscreen guidelines
- In the main screen, you will get two options Add File and Add Folder
- By clicking on “Add File” option – select multiple OST files to load in the software panel of conversion
- By clicking on “Add Folder” option – select complete OST data folder to load in the software panel for migration into PST
- Now, you can view selected OST files in a preview pane of the software and then click on the Export button to continue with the further steps
- After clicking on the Export option select PST as output format
- Now click on the Browse button and choose destination location path where you want to save the resultant files. Then, press on the Convert button to start the process
- After clicking on the Convert button the OST file to PST migration process will start and you can see a live conversion progress report.
- Within a few minutes, a new window will appear with the successful message i.e. Conversion Done Successfully.
- Now, finally, click on the OK option to complete the process
Conclusion:
The article is all about how a user can easily fix or resolve the error of “cannot expand the folder” of OST file. Here, we are providing different methods for those users who are searching this type of query like unable to expand the folder error of OST file. You can choose any method according to your need to fix the OST file error without any interruption.
